lm_sensors的软件可以帮助我们来监控主板,CPU的工作电压,风扇转速、温度等数据。这些数据我们通常在主板的 BIOS也可以看到。当我们可以在机器运行的时候通过lm_sensors随时来监测着CPU的温度变化,可以预防呵保护因为CPU过热而会烧掉。
1. 安装lm_sensors
现在基本上每个Linux都已经有lm_sensors包了,我们主要安装了就可以了。或者我们也可以通过源文件来自己编译。
1)在FC,RH, CENTOS下,用rpm:
[root@securitycn ~]# rpm -ivh lm_sensors-2.10.0-3.1.i386.rpm
3)编译源文件安装
我们可以通过:这里下载源文件
这里我们要注意的问题是要先安装libsysfs库,是Sysfsutils,Sysfsutils-devel软件
tar xzvf lm-sensors-xxx.tar.gz
make user
make user_install testing
下面我们就用一些简单的命令来利用lm_sensors来得到CPU的数据。我们要用root的身份来:
sensors-detect,然后它会自动搜索主板上的chipset和相应的driver,我们全部答YES就可以了
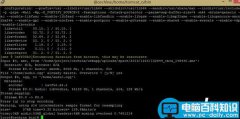
[root@securitycn ~]# sensors-detect
# sensors-detect revision 1.413 (2006/01/19 20:28:00)
This program will help you determine which I2C/SMBus modules you need to
load to use lm_sensors most effectively. You need to have i2c and
lm_sensors installed before running this program.
Also, you need to be `root', or at least have access to the /dev/i2c-*
files, for most things.
If you have patched your kernel and have some drivers built in, you can
safely answer NO if asked to load some modules. In this case, things may
seem a bit confusing, but they will still work.
It is generally safe and recommended to accept the default answers to all
questions, unless you know what you're doing.
We can start with probing for (PCI) I2C or SMBus adapters.
You do not need any special privileges for this.
Do you want to probe now? (YES/no):
全部默认YES即可。
然后我们启动lm_sensors :
/etc/init.d/lm_sensors start
Starting lm_sensors: [ OK ]
我们可以通过lsmod来确定我们需要的driver已经加载了没有
lsmod | grep i2c
i2c_isa 9153 2 w83627hf,w83781d
i2c_i801 11341 0
i2c_dev 12613 0
i2c_ec 9025 1 sbs
i2c_core 23745 6 w83627hf,w83781d,i2c_isa,i2c_i801,i2c_dev,i2c_ec
然后我们用sensors的命令就可以了:
[root@securitycn ~]# sensors
w83627hf-isa-0290
Adapter: ISA adapter共2页。
VCore 1: +3.33 V (min = +0.00 V, max = +0.00 V) ALARM
VCore 2: +3.36 V (min = +0.00 V, max = +0.00 V) ALARM
+3.3V: +0.93 V (min = +3.14 V, max = +3.46 V) ALARM
+5V: +5.11 V (min = +4.73 V, max = +5.24 V)
+12V: +4.56 V (min = +10.82 V, max = +13.19 V) ALARM
-12V: -7.10 V (min = -13.18 V, max = -10.88 V) ALARM
-5V: -1.93 V (min = -5.25 V, max = -4.75 V) ALARM
V5SB: +5.51 V (min = +4.73 V, max = +5.24 V) ALARM
VBat: +0.02 V (min = +2.40 V, max = +3.60 V) ALARM
fan1: 0 RPM (min = 2732 RPM, div = 2) ALARM
fan2: 0 RPM (min = 0 RPM, div = 2)
fan3: 0 RPM (min = 0 RPM, div = 2)
temp1: +38癈 (high = +50癈, hyst = +45癈) sensor = thermistor
temp2: +33.5癈 (high = +80癈, hyst = +75癈) sensor = thermistor
temp3: +33.5癈 (high = +80癈, hyst = +75癈) sensor = thermistor
vid: +0.000 V (VRM Version 10.0)
alarms:
beep_enable:
Sound alarm enabled
这里我们可以看到温度还没有相对应CPU,我们主要稍微修改一下/etc/sensors.conf就可以了,不过其实都不用我们自己去动手,一般我们都可以从主板生产商那里下载到配置文件。通过lmsensors我们就可以得到主板温度,CPU电压,风扇转速这些信息。我们可以根据这些数据来监察系统的运行情况来预防系统的问题。
接下来让它和MRTG整合在一起吧
[root@securitycn ~]# cd /usr/local/mrtg/bin
[root@securitycn ~]# vi temp.sh
#内容如下
#!/bin/bash
cputemp=`/usr/bin/sensors | grep temp1 |awk '{print $2}'|cut -c 2-4` #这句是说找出有temp1那一行,印出第二个列的2-4个字
systemp =`/usr/bin/sensors | grep temp2 |awk '{print $2}'|cut -c 2-5` 不用解释了吧
echo $cputemp
echo $systemp
# the uptime
uptime | sed 's:^.* up \(.*\), [0-9][0-9]* users.*$:\1:'
# my name
uname -n
[root@securitycn ~]# chmod +x temp.sh 改成可执行
[root@securitycn ~]# ./temp.sh 试试看有没有问题
39
33.5
15:36:19 up 22:28, 1 user, load average: 0.04, 0.09, 0.04
securitycn
再来写下面的文件
[root@securitycn ~]# cd ../etc/
[root@securitycn ~]# vi temp.cfg
WorkDir: /data1/usr/apache/htdocs/mrtg/temp/
Target[index]: `/usr/local/mrtg/bin/temp.sh`
MaxBytes[index]:80
Options[index]: gauge, nopercent, growright
YLegend[index]: Temp (度)
ShortLegend[index]: 度
LegendO[index]: 系统温度;
LegendI[index]: CPU温度;
Title[index]: 系统温度表
PageTop[index]:
主机温度表
[root@securitycn ~]# /usr/local/mrtg/bin/mrtg /usr/local/mrtg/etc/temp.cfg
执行3次就不报错了
然后加入到crontab里面
*/5 * * * * /usr/local/mrtg/bin/mrtg /usr/local/mrtg/etc/temp.cfg共2页。
![RedHat服务器上[Errno 5] OSError: [Errno 2]的解决方法](https://img.pc-daily.com/uploads/allimg/4752/11135115c-0-lp.png)