supportconfig作为Linux系统shell编写的工具,其功能是非常强大的,但还是有很多人对supportconfig工具不了解,不知如何使用supportconfig工具,下面小编就简单的给大家介绍下Linux安装使用supportconfig的方法。

一、supportconfig的安装
可以通过yast进行安装,也可以通过zypper命令进行安装,安装命令如下:
直接使用源进行安装
代码如下
#zypper install supportutils
也可以将rpm包下载下来使用yast进行安装或者在yast的管理界面里查找安装
#yast install supportutils-xxx.rpm
注:根据系统的版本不同,包名也可能是supportconfig 。
安装完成后可以使用rpm -ql supportutils 查看包中具体包含的文件信息,如下:
代码如下
# rpm -ql supportutils
/etc/schealth.conf
/etc/supportconfig.conf
/sbin/chkbin
/sbin/supportconfig
/usr/bin/schealth
/usr/share/man/man5/supportconfig.conf.5.gz
/usr/share/man/man8/chkbin.8.gz
/usr/share/man/man8/supportconfig.8.gz
注:上面的结果是在 suse11 sp1企业版上的测试的结果,在opensuse 13上目录结构会略有不同,其上使用的是新版本的supportconfig。
二、supportconfig用法
以下是supportconfig的帮助输出
代码如下
# supportconfig -h
=============================================================================
Support Utilities - Supportconfig
Script Version: 2.25-197
Script Date: 2010 04 02
=============================================================================
Usage: supportconfig [OPTION [OPTION 。。。]]
-h This screen
-A Activates all supportconfig functions with additional logging and full
rpm verification.
-B 《string》 Custom tar ball file name element
-C Creates a new default /etc/supportconfig.conf
-D Use defaults; ignore /etc/supportconfig.conf
-E 《string》 Contact email address
-F Display available supportconfig feature keywords (case-sensitive) used
with -i and -x
-G 《gpg_uid》 The GPG recipient‘s user ID used to encrypt the supportconfig tarball
-H 《number》 Limit number of included HA Policy engine files
-I 《number》 Default log file line count
-L Create a full file listing from ’/‘
-M 《string》 Contact terminal ID
-N 《string》 Contact name
-O 《string》 Contact company name
-P 《string》 Contact phone number
-Q Run in silent mode
-R 《path》 Log output directory
-S 《number》 Limit number of included SAR files
-T 《seconds》 Binary execution timeout
-U 《URI string》 Sets upload target URL and initiates an upload, supported
services include: ftp, scp, http, https
-M 《string》 Contact store ID
-X 《number》 Max system logs line count
-a Upload the tar ball to the specified alternate target VAR_OPTION_UPLOAD_ALT
-b Screen buffer mode
-d Exclude detailed disk info and scans
-e Search root file system for eDirectory instances; -L implied. Be patient.
-f From directory. Don’t collect report files, just use files in that
directory.
-g Use gzip instead of the default bzip2 compression.
-i 《keyword list》
Include keywords. A comma separated list of feature keywords that specify
which features to include. Use -F to see a list of valid keywords.
-l Gathers additional rotated logs
-m Only gather a minimum amount of info: basic env, basic health, hardware,
rpm, messages, y2logs
-o Toggle listed features on or off
-p Disable all plugins
-q Add a uuid to the tar ball filename to ensure uniqueness
-r 《srnum》
Includes the Novell 11 digit service request number when uploading
the tar ball to Novell
-s Include full SLP service lists
-t Target directory. Just save log files here, do not create tarball.
-u Upload the tar ball to the specified VAR_OPTION_UPLOAD_TARGET.
-v Performs an rpm -V for each installed rpm NOTE: This takes a long time
to complete
-x 《keyword list》
Exclude keywords. A comma separated list of feature keywords that specify
which features to exclude. Use -F to see a list of valid keywords.
-y Only gather the minimum y2log files.
Use Ctrl- to try and skip a function that is hanging.
-----------------------------------------------------------------------------
NOTE:
This tool will create a tar ball in the /var/log directory. Please attach
the log file tar ball to your open Service. Request at the following URL:
https://secure-support.novell.com/eService_enu
If you cannot attach the tar ball to the SR, then email it to the engineer.
Please submit bug fixes or comments via:
http://en.opensuse.org/Supportutils#Reporting_Bugs
=============================================================================
Support Utilities - Supportconfig
Script Version: 2.25-197
Script Date: 2010 04 02
=============================================================================
默认supportconfig或supportconfig -A执行后会将收集后的结果打包为一个nts_主机名_日期.tbz 文件,同时会生成一个以该文件名加.md5后缀的文件。
上一页1234下一页共4页
三、supportconfig常用示例
1、supportconfig -A 收集所有日志
代码如下
# supportconfig
=============================================================================
Support Utilities - Supportconfig
Script Version: 2.25-290
Script Date: 2011 07 14
=============================================================================
Gathering system information
Data Directory: /var/log/nts_361way.com_140825_1504
Basic Server Health Check.。。 Done
RPM Database.。。 Done
Basic Environment.。。 Done
Basic Health Report.。。 Done
System Modules.。。 Done
Memory Details.。。 Done
Disk I/O.。。 Done
YaST Files.。。 Done
Auditing.。。 Done
Crash Info.。。 Done
NTP.。。 Done
PROC.。。 Done
Boot Files.。。 Done
SLERT.。。 Skipped
Updates.。。 Done
SMT.。。 Skipped
Novell eDirectory.。。 Please Wait.。。 Skipped
Novell LUM.。。 Skipped
Novell NCP.。。 Skipped
Novell NSS.。。 Skipped
Novell DFS.。。 Skipped
Novell SMS.。。 Skipped
Novell NCS.。。 Skipped
Novell AFP.。。 Skipped
Novell CIFS.。。 Skipped
Novell iManager.。。 Skipped
HA Cluster.。。 Skipped
OCFS2.。。 Skipped
DRBD.。。 Skipped
PAM.。。 Done
LDAP.。。 Done
CIMOM.。。 Done
Open Files.。。 Done
Environment.。。 Done
ETC.。。 Done
SYSCONFIG.。。 Done
SYSFS.。。 Done
System Daemons.。。 Done
CRON.。。 Done
AT.。。 Done
UDEV.。。 Done
LVM.。。 Please Wait.。。 Base Detail Done
EVMS.。。 Skipped
Software Raid.。。 Done
Multipathing.。。 Done
Networking.。。 Done
Web.。。 Done
InfiniBand.。。 Done
DNS.。。 Done
DHCP.。。 Done
SLP.。。 Done
SSH.。。 Done
iSCSI.。。 Done
Samba.。。 Done
NFS.。。 Done
AUTOFS.。。 Done
SAR Files.。。 Done
AppArmor.。。 Done
Xen.。。 Done
KVM.。。 Done
X.。。 Done
Printing.。。 Done
SMART Disks.。。 Excluded
Hardware.。。 Please Wait.。。 Done
File System List.。。 Skipped
Supportability Analysis.。。 Please Wait.。。 Done
System Logs.。。 Done
Creating Tar Ball
==[ DONE ]===================================================================
Log file tar ball: /var/log/nts_361way.com_140825_1504.tbz
Log file size: 4.0M
Log file md5sum: 484b111cda54ca04419facd82a1da7d7
Please attach the log file tar ball to your open Service Request at the
following URL:
https://secure-support.novell.com/eService_enu
You can also upload the tar ball to ftp.novell.com/incoming, or just use
supportconfig -ur 《srnum》, to upload the tar ball automatically.
If you cannot attach the tar ball to the SR, then email it to the engineer.
=============================================================================
其他常用用法:
//以最小选项搜集所需的信息
# supportconfig -m
//在输出中包含附加的联系人信息
# supportconfig -E tux@example.org -N “Tux Penguin” -O “Penguin Inc.” 。。。
//要查看完整的功能列表
# supportconfig -F
//仅收集某个模块的用法,如LVM相的信息
# supportconfig -i LVM
//-x 的功能与-i刚好相反,是排除某个模块不收集
# supportconfig -x LVM
//使用-U url 可以将收集的结果上传到服务器上,直接的服务有ftp, scp, http, https,如:
# supportconfig -A -U http://www.361way.com/files/
具体可以参看官方的 常用的supportconfig选项 部分 。
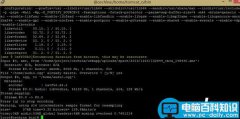
supportconfig收集的系统健康报告:
代码如下
# supportconfig -A
# cd /var/log
# tar jxvf nts_361way.com_140825_1504.tbz
# more basic-health-report.txt
#==[ Command ]======================================#
# /usr/bin/schealth -q
######################################################################
Supportconfig Health Check Report Tool v1.00-5
Date Checked: 09/12/14 04:40:37
######################################################################
Health Check Files [ Green ]
Processes Waiting for Run Queue [ Green ]
Kernel Taint Status [ Red ]
Kernel Tainted: 64 》 0
CPU Utilization [ Green ]
Interrupts Per Second [ Green ]
Context Switches Per Second [ Green ]
Free Memory and Disk Swapping [ Green ]
Used Disk Space [ Green ]
Uninterruptible Processes [ Green ]
Zombie Processes [ Green ]
######################################################################
Status: Red Flag
Checked: /var/log/nts_361way.com_140825_1504/basic-health-check.txt
Report: /var/log/nts_361way.com_140825_1504/basic-health-report.txt
######################################################################
上面的报告中,我们发现kernel Tainted 状态为red ,该处是通过cat /proc/sys/kernel/tainted 进行判断的,如果值不为0,则是内核受到污染 ,显的值不同,具体可以参看/usr/src/linux/Documentation/sysctl/kernel 文件(具体的值不一样,代表的意义也不一样)。64报红是由于加载了非系统官方或非开源的模块所致( Unsupported modules loaded)。
四、supportconfig配置文件
supportconfig的默认配置文件是 /etc/supportconfig.conf ,其默认内容如下:
代码如下
# cat /etc/supportconfig.conf
####################################
# Default Options
####################################
OPTION_AFP=1
OPTION_APPARMOR=1
OPTION_AUDIT=1
OPTION_AUTOFS=1
OPTION_BOOT=1
OPTION_CHKCONFIG=1
OPTION_CIFS=1
OPTION_CIMOM=1
OPTION_CRASH=1
OPTION_CRON=1
OPTION_DFS=1
OPTION_DHCP=1
OPTION_DISK=1
OPTION_DNS=1
OPTION_EDIR=1
OPTION_ENV=1
OPTION_ETC=1
OPTION_EVMS=1
OPTION_HA=1
OPTION_HCREPORT=1
OPTION_IB=1
OPTION_ISCSI=1
OPTION_LDAP=1
OPTION_LUM=1
OPTION_LVM=1
OPTION_MEM=1
OPTION_MOD=1
OPTION_MPIO=1
OPTION_NCP=1
OPTION_NCS=1
OPTION_NET=1
OPTION_NFS=1
OPTION_NSS=1
OPTION_NTP=1
OPTION_OCFS2=1
OPTION_OFILES=1
OPTION_PAM=1
OPTION_PRINT=1
OPTION_PROC=1
OPTION_SAM=1
OPTION_SAR=1
OPTION_SLERT=1
OPTION_SLP=1
OPTION_SMART=0
OPTION_SMB=1
OPTION_SMS=1
OPTION_SMT=1
OPTION_SRAID=1
OPTION_SSH=1
OPTION_SYSCONFIG=1
OPTION_SYSFS=1
OPTION_UDEV=1
OPTION_UP=1
OPTION_UPD=1
OPTION_WEB=1
OPTION_X=1
OPTION_XEN=1
ADD_OPTION_EDIR=0
ADD_OPTION_FSLIST=0
ADD_OPTION_LOGS=0
ADD_OPTION_MINDISK=0
ADD_OPTION_MINYAST=0
ADD_OPTION_RPMV=0
ADD_OPTION_SLP=0
VAR_OPTION_BIN_TIMEOUT_SEC=300
VAR_OPTION_CONTACT_COMPANY=“”
VAR_OPTION_CONTACT_EMAIL=“”
VAR_OPTION_CONTACT_NAME=“”
VAR_OPTION_CONTACT_PHONE=“”
VAR_OPTION_CONTACT_STOREID=“”
VAR_OPTION_CONTACT_TERMINALID=“”
VAR_OPTION_CUSTOM_ARCH=“”
VAR_OPTION_GPG_UID=“”
VAR_OPTION_LINE_COUNT=500
VAR_OPTION_LOG_DIRS=“/var/log /tmp”
VAR_OPTION_MSG_MAXSIZE=500000
VAR_OPTION_PENGINE_FILES_LIMIT=250
VAR_OPTION_SAR_FILES_LIMIT=30
VAR_OPTION_SBM=0
VAR_OPTION_SILENT=0
VAR_OPTION_UNIQUE_FILE=0
VAR_OPTION_UPLOAD_ALT=‘https://secure-www.novell.com/upload?appname=supportconfig&file={tarball}’
VAR_OPTION_UPLOAD_TARGET=‘ftp://ftp.novell.com/incoming’
配置文件中列出了默认收集的模块信息,公司信息、邮件、电话及上传的服务器目录等。
五、supportconfig总结
supportconfig是使用shell 编写的一个功能十分强大的工具,具体可以通过vim /sbin/supportconfig 查看 。同时,由于linux命令上的通用性,我们甚至可以很简单的进行修改后将其移植到其他linux 发行版上。不过显然这是没必要的,因为还有一个比较通的用的开源工具sosreport和其作用差不多,而其适用性更强。
supportconfig在Linux系统的安装使用就介绍到这里了,supportconfig的用法还有很多,用户可根据本文的方法举一反三,掌握更多用法。


![RedHat服务器上[Errno 5] OSError: [Errno 2]的解决方法](https://img.pc-daily.com/uploads/allimg/4752/11135115c-0-lp.png)